Halloween is the time to create something a little different with stained glass. From glowing pumpkins and black cats to ghosts and autumn leaves Halloween designs offer plenty of chances to play with color, light and interesting shapes.
If you are new to stained glass choosing the right pattern can be harder than it looks. Some designs look beautiful in pictures. Contain too many tiny pieces, complicated curves or narrow sections that are difficult to cut from real glass.
The good news is that easy Halloween stained glass patterns for beginners do not need to be complicated to look beautiful. A recognizable silhouette, a well-chosen colors and practical glass shapes can create a finished piece that looks impressive in a sunny window.
In this guide we will explore 10 Halloween stained glass pattern ideas, how to choose a beginner- design, which glass colors work well and what to consider before starting your first project.
Whether you are planning a suncatcher, a spooky bat or a seasonal window decoration you will find practical ideas to help you choose a project you can enjoy making.
What Makes a Halloween Stained Glass Pattern Easy for Beginners?
Before choosing a design it is worth understanding what makes one stained glass pattern easier to work with than another.
A pattern might look simple on a screen. Become difficult when you start cutting glass. The number of pieces matters but so do their shapes, sizes and how they fit together.
Here are five things to look for.
- Fewer larger glass pieces
Patterns with fewer individual pieces usually require cuts, less grinding and fewer solder joints. Larger pieces can also be easier to handle than sections.
However fewer pieces do not automatically mean a project. A pattern with curves or long narrow shapes can still be challenging.
- Simple curves and clear shapes
Broad curves and recognizable silhouettes are starting points. Pumpkins, moons, ghosts and simple leaves can look attractive without requiring lots of details.
Tight curves sharp interior corners and thin points are worth examining carefully before you begin.
- A limited color palette
You do not need ten glass colors to make a beautiful Halloween decoration.
Three or four chosen colors can create a strong visual effect. Using colors also makes it easier to plan which glass to buy and where each color belongs.
- A clear pattern layout
A printable stained glass pattern should make it easy to understand how the individual pieces fit together.
Look for lines clearly separated sections and helpful numbering or a color reference when provided.
- A design suited to its finished size
A pattern intended for a suncatcher may need to be adjusted before being enlarged into a larger panel. Likewise shrinking a design can make some pieces too small to cut
Always consider the finished dimensions before choosing a pattern.
Beginner tip: When comparing two designs imagine cutting every piece from real glass. If the design depends on tiny details to make sense a simpler alternative may be a better first project.
10 Easy Halloween Stained Glass Pattern Ideas
These ideas range from silhouettes to slightly more detailed seasonal designs. Their actual difficulty will depend on the pattern the size of the glass pieces and your experience.
- Classic Pumpkin Stained Glass Pattern
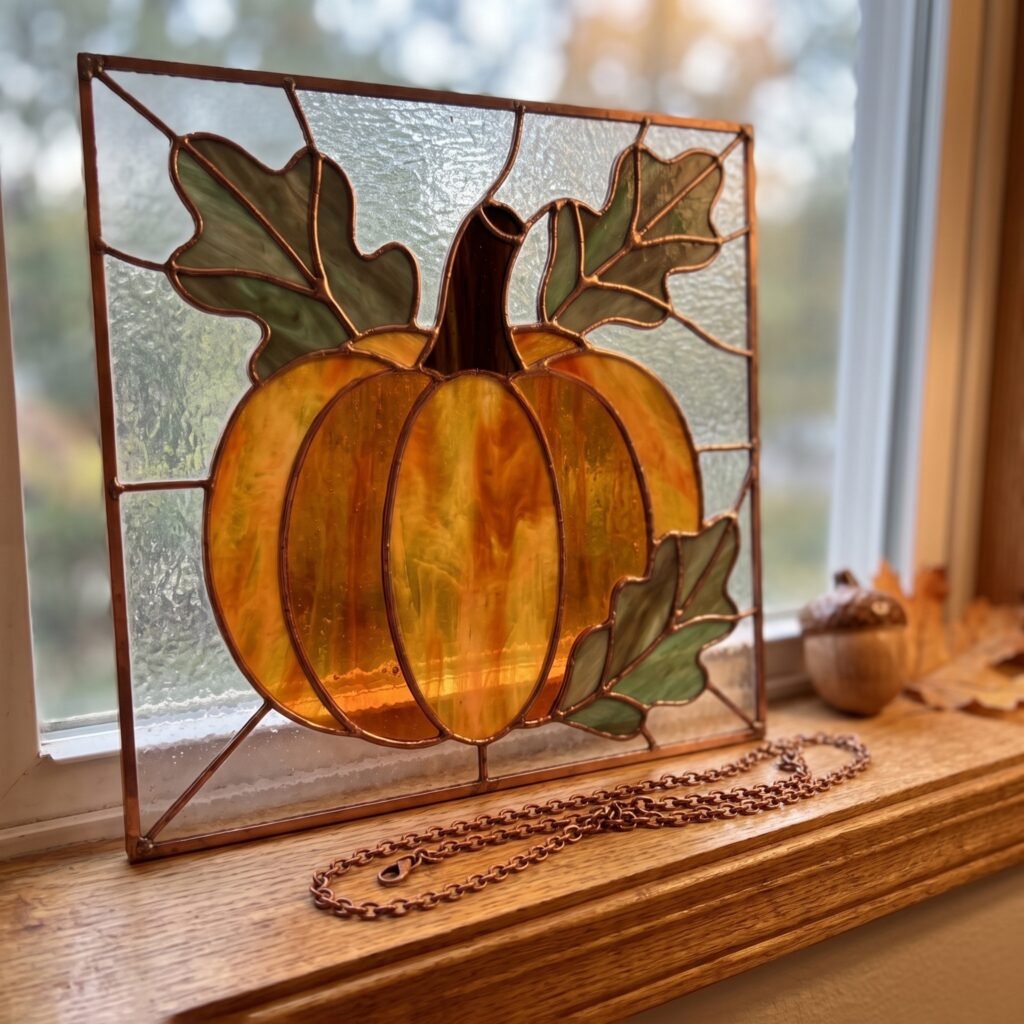
A pumpkin is one of the recognizable Halloween subjects making it an excellent choice for a seasonal stained glass project.
A simple pumpkin design can use sections to represent its rounded lobes, with a small stem at the top. You can keep the face plain. Introduce a few carefully placed shapes to create a traditional jack-o’-lantern.
Suggested colors: Amber orange, yellow and dark brown or black.
Why it works: The rounded silhouette is immediately recognizable and warm glass colors look beautiful when illuminated by sunlight.
Beginner tip: Avoid dividing every pumpkin lobe into small sections. Larger areas of glass can create the same overall effect with less complicated construction.
- Black Cat Stained Glass Suncatcher

Black cats are a fit, for Halloween decorations but their simple silhouettes can work throughout the year.
A sitting cat, a cat or a cat with an arched back can all make attractive stained glass designs. For a beginner a clear silhouette is often more practical than a detailed cat face.
Suggested colors: Black deep purple, amber and clear glass.
Why it works: The dark cat contrasts beautifully with a background letting the cat shape stand out.
Beginner tip: Pay attention to the cat ears, cat tail and cat legs. Thin sections can be fragile or difficult to cut so a simplified silhouette may be more practical.
- Bat Stained Glass Pattern
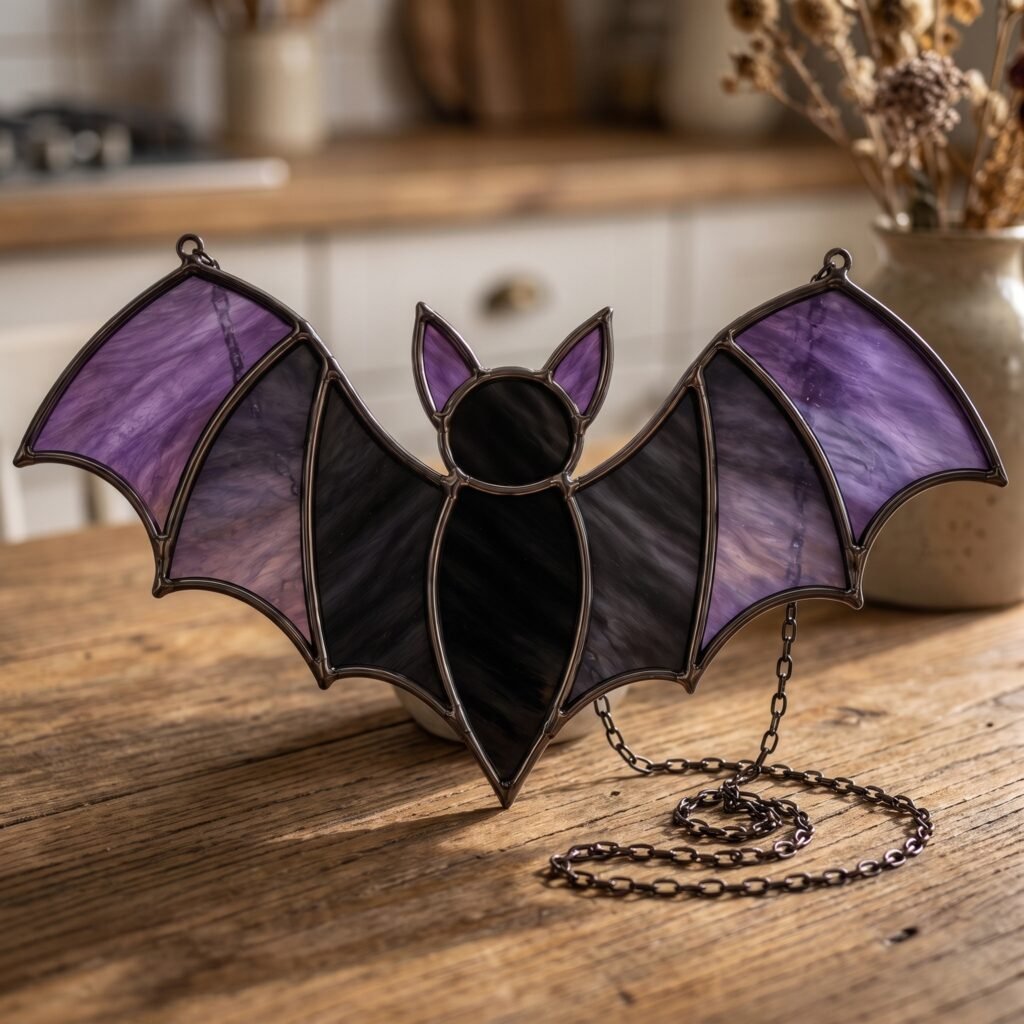
A bat is another choice for an easy Halloween stained glass project.
The bats wide wings create a shape and the bat design can stay visually interesting without many internal details. A symmetrical bat is especially appealing because the two bat wings balance the composition.
Suggested colors: Charcoal, black, violet, blue and clear glass.
Why it works: The bat silhouette does most of the work so you can focus on glass color and texture instead of adding many small pieces.
Beginner tip: Look for a bat design with wing sections and no unnecessarily narrow tips. A simple bat can still look dramatic when made with purple glass.
- Friendly Ghost Stained Glass Pattern
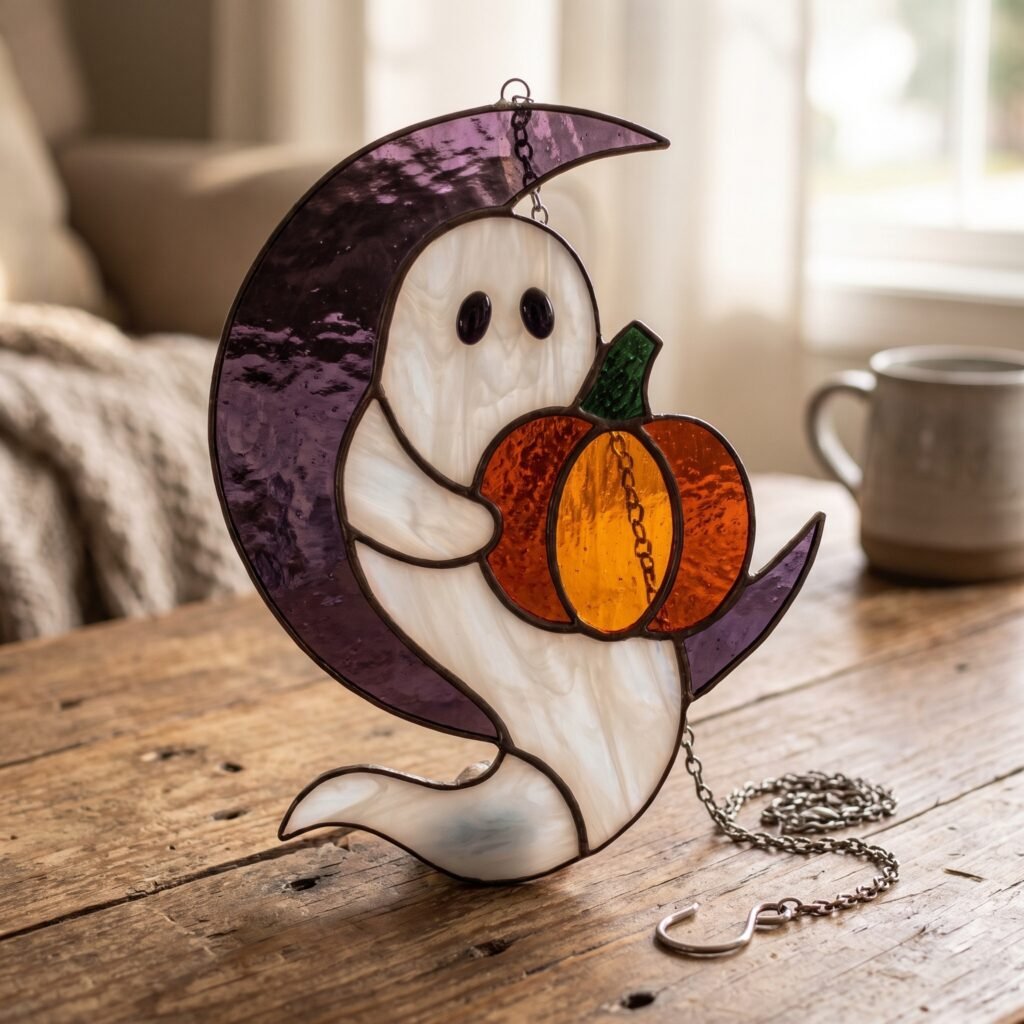
Not every Halloween decoration needs to look spooky. A friendly ghost can bring a touch to a window or seasonal display.
A simple ghost silhouette with a rounded ghost head and flowing edge can be easier to interpret than a ghost design filled with tiny facial details.
Suggested colors: Clear, white opalescent, pale blue and a small amount of glass for the eyes if the pattern includes them.
Why it works: The ghost shape is familiar and light-colored glass can create a luminous effect.
Beginner tip: Check the ghost curves around the bottom of the ghost. Gentle ghost curves are generally more manageable than tight waves or narrow points.
5. Autumn Leaf Stained Glass Pattern
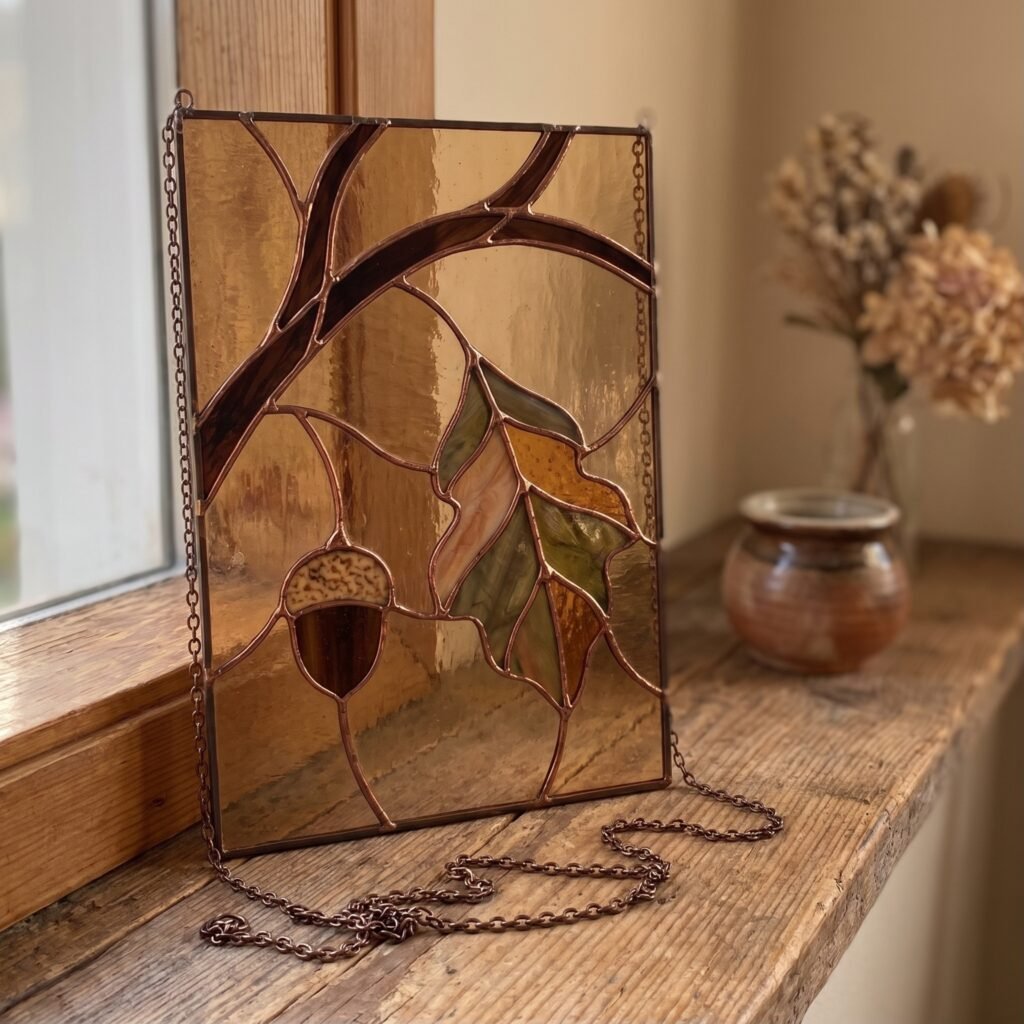
If you prefer a subtle seasonal decoration an autumn leaf is a beautiful choice.
Maple leaves, oak leaves and simple rounded leaves can all be used in fall‑themed stained glass projects. They also remain suitable, for display after Halloween has passed.
Suggested colors: Amber, copper orange, golden yellow and deep red.
Why it works: Warm glass colors naturally evoke autumn and the finished leaf can complement seasonal decorations.
Beginner tip: Choose a leaf with lobes and a manageable outline. Serrated leaf edges can introduce many extra cuts.
The Best Glass Colors for Halloween Stained Glass
Halloween designs are particularly fun because they work with both autumn colors and darker more atmospheric palettes.
You can use the pattern several times and achieve completely different results simply by changing the glass.
Traditional Halloween colors
Orange, black and purple create a Halloween look. Amber and golden yellow can add warmth without making the design too busy.
This combination works well for pumpkins, bats, cats and witch hats.
Gothic and moody colors
Deep violet, navy, charcoal, burgundy and smoky glass can create an appearance.
These colors work well for crescent moons, bats, cats and spiderwebs.
Natural autumn colors
Amber, copper, yellow dark green and brown create a more seasonal palette.
This is an option for pumpkins, autumn leaves and designs that you want to display beyond October.
Light and luminous colors
Clear pale blue, white opalescent and soft lavender can help a design feel lighter.
These colors are especially useful for ghosts, moons, stars and decorative backgrounds.
Should you use smooth glass?
Both can work beautifully.
Smooth glass gives the design a consistent appearance while textured glass can add variation as light passes through it. Opalescent and other transparent glasses produce a different visual effect from clear cathedral glass.
Before committing to your color choices place samples next to one another if possible. A color that looks perfect on a screen may appear different when held against light.
What Tools and Materials Do You Need?
The exact materials depend on the pattern and the technique you are using. Many small decorative projects use the copper foil method while other designs are constructed with lead came.
For a copper foil project you may need:
- A printed stained glass pattern
- Suitable stained glass
- Glass cutter
- Running or breaking pliers as appropriate
- Glass grinder if required for fitting the shapes
- Copper foil
- Soldering equipment and suitable solder
- Eye protection and appropriate workspace protection
- Cleaning and finishing supplies
- A suitable hanging or support system, for the finished design
Glass cutting and soldering need handling. Follow the instructions for your tools and materials wear eye protection and work in a well‑ventilated area when you use soldering products.
If you are a beginner learning the basic cutting and fitting steps with guidance before trying a complex project can save you time and glass.
One point: A printable pattern is a template, not a substitute for construction instructions or safe working practices. Check the patterns intended technique and any instructions supplied by its designer before you begin.
How to Use a Printable Halloween Stained Glass Pattern
A stained glass pattern can be a convenient starting point because you can print it sort the individual sections and prepare the project before you cut your glass.
Here is a practical workflow.
Step 1: Check the files
Read the product description and confirm what the download contains. Depending on the designer a digital pattern may provide a PDF, image files, a template, a color reference or other formats.
Do not assume every listing contains the same files.
Step 2: Print at the size
Check the intended finished dimensions and printing instructions.
If you use a print dialog that automatically fits the page the pattern may print at a scale. Confirm the scale before you transfer the pattern to glass.
Step 3: Study the pieces
Look at the pattern before you cut anything. Identify the pieces, the tightest curves and any narrow sections.
This is the time to decide whether the design fits your current skill level.
Step 4: Plan the glass colors
Use a reference image if one is provided or make your own color plan.
Labeling your intended glass colors can help you avoid confusion later.
Step 5: Cut and fit carefully
Follow the pattern and your chosen stained glass technique. Check the fit of the pieces before you move to the construction stage.
Rushing the cutting or grinding stage can make assembly more difficult.
Step 6: Assemble and finish
Follow the instructions for foiling or lead came, soldering, cleaning and finishing. The details will vary according to the construction method.
Once finished select a display location that supports the weight and shape of your piece.
Common Mistakes to Avoid When Choosing Halloween Patterns
A planning before you start can make your project much more enjoyable.
Choosing a design based on its picture can mislead you. A beautiful finished example does not show how difficult the pattern is to construct. Look at the lines and pieces.
Ignoring sections is a mistake. Check the pieces carefully as they may be more difficult to cut, grind and handle than the larger areas.
Using many colors can complicate the work. A large palette is not necessary. Repeating colors often creates a cohesive result.
Resizing without checking the piece dimensions can cause problems. A pattern that works at one size may become difficult when reduced. Check the pieces after scaling.
Assuming every looking pattern is beginner-friendly can be risky. Piece count, shape, dimensions and construction method all matter.
Adding detail that does not improve the design is unnecessary. More pattern lines can make a project harder without making the finished piece more attractive. Sometimes a strong silhouette and good glass selection are enough.
Where to Display Your Finished Halloween Stained Glass
After spending time cutting and assembling your design you will want to display it where the glass can be appreciated.
In a window
A window is a natural choice for a stained glass suncatcher or panel. Daylight can reveal the colors and textures in a way that artificial lighting may not.
In a display
Combine your finished piece with pumpkins, autumn leaves or other decorations. A small stained glass design can become the point of a seasonal arrangement.
In a craft room or creative workspace
Halloween stained glass can also be displayed throughout the year in a room dedicated to art and crafts.
As a gift
A finished bat, cat, pumpkin or moon design can be a thoughtful gift for someone who enjoys Halloween or handmade décor.
Before hanging any piece make sure the mounting method is appropriate, for its weight and construction.
Where to Find Halloween Stained Glass Patterns
When searching for Halloween stained glass patterns think about what you want to make than searching only for a general collection of designs.
For example you might look for:
Easy pumpkin stained glass patterns
Halloween cat stained glass patterns
Bat stained glass suncatcher patterns
ghost stained glass patterns
Autumn leaf stained glass patterns
Beginner-friendly Halloween window panels
Printable Halloween stained glass pattern PDFs
These specific searches can help you find a design that matches your subject your preferred project type and your skill level.
Before buying a pattern look at the product pictures the intended size, how hard it is the file types and the instructions that are included. Also check the sellers rules especially if you want to sell pieces.
If you find a design that you like be sure you are buying a template and not a finished stained glass piece. Digital downloads usually give you files that you use to make the project by yourself; no physical artwork is sent unless the listing says otherwise.
Ready to Make Your Halloween Stained Glass Pumpkin?
A pumpkin is a way to bring the colors of autumn into your home. The warm orange glass, the curved pieces and the leafy details in this design make a seasonal look that looks very good in a sunny window.
If you want to make a piece yourself you can look at the printable pumpkin pattern in my Etsy shop.
Get the Halloween Pumpkin Stained Glass Pattern in My Etsy Shop
Please check the product listing for the digital files that are included the pattern size and the construction details. This is a pattern purchase, not a shipment of a finished glass panel.
Whether you choose a pumpkin, a bat or a simple black cat the rewarding part is turning a design into something you made with your own hands.
Frequently Asked Questions
What are the easiest Halloween stained glass patterns for beginners?
Simple pumpkins, bat outlines, friendly ghosts, basic witch hats and uncomplicated autumn leaves are good starting points. Pick patterns that have piece sizes and easy curves instead of just looking at the subject to judge how hard it is.
How pieces should a beginner Halloween stained glass pattern have?
There is no one number. A pattern that has a number of well-shaped pieces can be easier than one with many tiny sections but even a design with few pieces can be hard if the cuts are complicated. Think about piece size and shape well as the total number of pieces.
What colors are best for Halloween stained glass?
Orange, amber, black, purple and golden yellow are choices. Blue, violet, burgundy and smoky glass can give a darker look while clear and pale glass can make moons and ghosts feel brighter.
Can I. Reduce a stained glass pattern PDF?
Often, yes. Check the designers instructions first. Changing the size also changes the dimensions of every piece. If you shrink a pattern much some pieces may become too small; if you enlarge it the proportions or finished size may change.
Are stained glass patterns for people who have never worked with glass?
Some patterns are made for beginners. Stained glass still needs the right tools, careful cutting and safe handling. If you have never worked with glass start with instructions and a basic project before trying a more complex design.
Can I sell items made from a purchased stained glass pattern?
That depends on the designers license and terms of use. Read the listing carefully. Contact the seller if the allowed uses are not clear. Buying a pattern does not automatically give you permission to copy the files or make the design for every commercial purpose.
Is a stained glass pattern a finished product?
Usually a digital pattern is a template that you use to make the finished project yourself. Check the listing to confirm the contents the file formats, the printing requirements and whether any physical product is included.
Final Thoughts
Halloween is a chance to experiment with stained glass whether you like a bright orange pumpkin, a mysterious black cat or a simple bat outline.
The best beginner project is not always the one, with the pieces or the simplest picture. It is the one whose shapes, sizes and construction needs match your skills while still giving you a design you are excited to finish.
Start with an outline pick glass colors that work well together and take your time planning each piece. As you get comfortable cutting and fitting glass you can move on to more detailed seasonal designs.
Remember: you do not need dozens of tiny pieces to make something beautiful. Thoughtful design and chosen glass can do most of the work.
First choose a pattern you love. Next prepare your glass carefully. Finally enjoy creating your Halloween stained glass decoration.
One Response